Sensitivity adjustment method of SMT Fuji placement machine NXT conveyor track circuit board passing sensor
Jan 27, 2024
1. Remote adjustment method
2. Adjustment methods on the machine
There are two ways to adjust the sensitivity of the NXT module's transportation track circuit board (PCB) through the sensor: remote adjustment and on-machine adjustment.
1. Remote adjustment method
(1) Use additional software to adjust the sensitivity of the sensor. This method can be used to adjust all the transportation track sensors on the module at one time. Of course, it can also be adjusted on a single module.
1. Start the add-on software and select the name of the target machine from the "Front Screen". The registration screen is displayed.
2. Please enter the user ID directly or specify it from the specified selection box.
3. Please enter the password correctly and click "Register".
4. Select the module to adjust the sensor and click "Remote Operation".
5. Please select "Adjust the sensitivity of the conveyor track sensor".
6. Please confirm whether the sensors such as the circuit board are covered and then press the "Start" button. Adjust the sensitivity of the sensor through the circuit board of the selected module.
(2) Sensitivity adjustment of the transportation track circuit board through the sensor
The conveyor track circuit board sensor is a transmission-type sensor that can automatically adjust its sensitivity so that it can detect accurately even when the width of the conveyor track changes. When a circuit board, etc. is removed and the conveyor track width is changed manually when a malfunction occurs, the sensor's automatic sensitivity adjustment function is canceled and an error message is displayed. At this time, please follow one of the following methods to restore automatic sensitivity adjustment.
a. Rotate the ball screw to narrow the width of the conveyor rail. (While looking at the amount of incident light displayed on the sensor, rotate it so that it displays a positive value. After the positive value is displayed, the automatic sensitivity adjustment function resumes.)
b. Use add-on software to install sensor sensitivity.
c. Using the installer amplifier on the machine, install the sensor sensitivity.
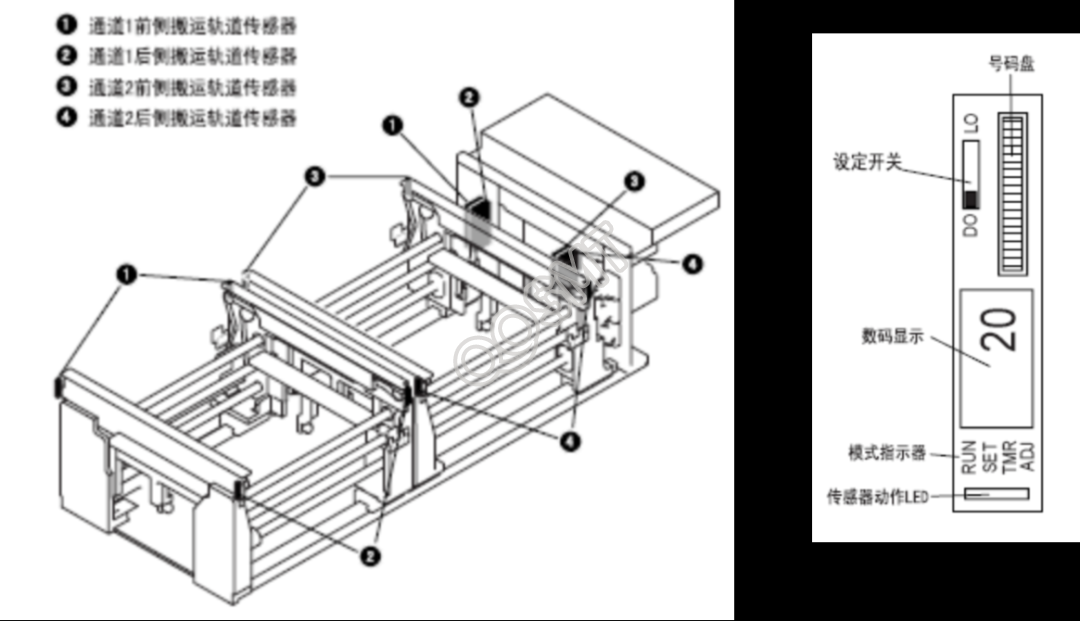
2. Adjustment methods on the machine
Operate the individual sensor amplifiers on the machine to make adjustments.
1. Pull the module to be adjusted forward.
2. Open the sensor amplifier cover.
3. Please confirm that the ON status switch is set to "LO".
4. After pressing the dial once, the display on the digital display changes to "AA" and the RUN on the mode cursor indicator flashes.
5. Rotate the dial so that the digital display reads "PH". At this time, SET of the mode cursor indicator flashes.
6. After pressing the dial once, the "PH" display flashes while SET does not flash.
7. After pressing the dial once, the value of the sensor amplifier at this time will flash on the digital display. (Example: 90)
8. Rotate the dial until the display shows 90.
9. After the display shows 90, press the dial once and enter the value. "PH" will be displayed.
10. When the dial is pressed again, SET on the mode cursor indicator changes to flashing display.
11. "AA" is displayed, and RUN on the mode display flashes.
12. When the dial is pressed again, the display on the digital display changes to the current measured value, and the RUN indicator on the mode indicator stops flashing.
13. Cover the adjusted sensor optical axis. Please confirm whether the LED of the sensor is turned off when the optical axis is blocked. If the LED does not respond correctly even if the light axis is blocked, please repeat the above steps.
14. Close the sensor amplifier cover and insert the module into its original position.